Screenshots can be useful at work, important for note-taking, or requested by tech support to better illustrate the bug you’re experiencing.
There are a number of ways to accomplish this simple task in Windows, and we’ve detailed each of the available methods below. And yes, most of these methods work just as well on Windows 11 as they do on Windows 10. Read on to find out how to take a screenshot on a Windows PC.
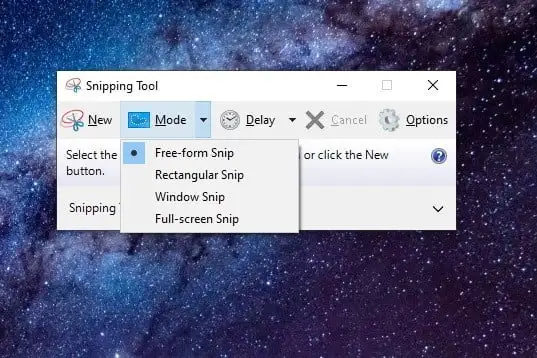
Image used with permission of the copyright holder
How to take a screenshot on Windows PC: Snipping Tool (Windows 10 and 11)
The best native method is the Snipping Tool. This built-in screenshot utility works well enough, but it’s not the most powerful or versatile when it comes to saving snapshots. However, it is a utility that allows users to better define and capture parts of their desktop display as screenshots. Here’s how to use it.
Step 1: To get started, just type Cutter into the taskbar search box and select the resulting application. If you are using Windows 10, once it opens, you will see a notification that it is “moving to a new home” in the next update. Don’t worry. Even on Windows 11, this tool is still available, but Microsoft recommends you use it Win + Shift + S keyboard shortcuts.
Step 2: In Windows 10, select Mode button to expand the menu. You will find four screen capture options: Window image (Free form cut), squares in an area (Rectangular cut), take the current window (Window cutout), and capture the entire screen (Full screen shot).
In Windows 11, you have to choose New or press Windows key + Shift + S keyboard shortcut to start snip. Once you’ve done both, the screen will darken slightly and you’ll be presented with the four “mode” options mentioned above at the top of the screen.
Select one of these modes to start your screenshot.
Step 3: Once you take a screenshot, the Snipping Tool interface will display your screenshot. You can make light edits like using a pen or highlighter, or delete something.
(In Windows 11, this editing screen may appear automatically, or you must select the notification that appears first to open the editing screen.)
Step 4: Once you have finished editing in the Snipping Tool, select it Submit in the top left corner then click Save as options listed on the drop-down menu.
In Windows 11: Select Save as disk icon in the top right corner, name your file in the screen that appears, and select it Keep knob.

Image used with permission of the copyright holder
How to take a screenshot on Windows PC: Snip & Sketch (Windows 10)
Snip & Sketch is the latest version of Microsoft’s snipping utility. You can access this tool from Beginning menu or by typing Win + Shift + S on your keyboard. Here’s how to use it.
(Notes: Snip & Sketch is no longer available on Windows 11 and has been replaced by the updated Snipping Tool app which combines elements of Snip & Sketch. Nevertheless, the following instructions (especially steps 1, 2, and 4) are still generally correct for the Windows 11 Snipping Tool).
Step 1: If you use a keyboard shortcut, the screen goes dark and displays a five-button toolbar at the top. You have the same functionality found in the older Snipping Tool, but it doesn’t save your screenshots as files. Instead, the image goes straight to your clipboard first.
Step 2: You’ll also see a desktop notification letting you know that the image has been copied to the clipboard. The same notification gives you the option to edit images captured within the Snip & Sketch app. You can access this last option by selecting the desktop notification itself. If you select notifications, the screenshot will be loaded within the app, allowing you to crop the image and use a pen, pencil, highlighter, or eraser.
Step 3: If you load the Snip & Sketch app, select the drop-down arrow next to it New button in the top left corner and select it Scissors now in the drop-down menu. The screen goes dark, and a five-button toolbar appears. Take your snip, and the image you want will automatically load in the Snip & Sketch app, ready for you to edit.
Step 4: Save the image anywhere on your PC by selecting Disc style knob. If you want to edit and save the screenshot using any installed image editor, select it Three dots icon on the toolbar and select it Open with option in the drop-down menu. (In Windows 11, you just choose Edit in Paint button, to edit the screenshot in Microsoft Paint.)
How to take a screenshot on Windows PC: keyboard shortcuts (PrintScreen)
Windows provides six methods to capture your desktop as an image using keyboard shortcuts. Three are based on the Print Screen key (PrtScn), while the remaining three require the Windows key (Win).
On external keyboards, you will find a dedicated PrtScn button located in the upper right corner. The Win button is usually at the bottom left, between the Control (Ctrl) and Alternate (Alt) buttons. It displays the Windows logo, so it’s hard to miss.
On laptops, the Print Screen command can be combined with other functions in one button. In this case, you have to press the Function key (Fn) in addition to the Print Screen key.
Here’s a breakdown of the six screenshot commands:
-
Print Screen (PrtScn): Captures the entire screen. If you have more than one display, this function captures everything displayed on all connected displays as one image. By default, this method does not save your image as a file, but only sends the captured image to the Windows clipboard. (On Windows 11, pressing the Print Screen key on your keyboard may automatically open the Snipping Tool. But you can disable it by going to Arrangement > Accessibility > Keyboardthen turn it off Use the Print screen button to open the Snipping Tool.)
-
Alt + Print Screen: Captures one window. Make sure to highlight the target window first, such as a document or browser, before pressing these two buttons (or three on some laptops). By default, this method does not save your image as a file, but only sends the image contained in the capture window to the clipboard.
-
Win + Print Screen: Captures the entire screen. The difference here is that Windows saves the image as a file. By default, it is sent to C:Users
Image>Screenshot or C:Users OneDrive>Images>Screenshot on your PC. -
Win + Shift + S: Take a screenshot using the built-in screenshot tool called Snip & Sketch (or the new Snipping Tool app in Windows 11). The screen dims and gives four options on a small toolbar (not included GO OUT icon): Snip/rectangular mode, Snippet/freeform mode, Snapshot/window modeAnd Snapshot/full screen mode. This tool does not save the capture as an image, but only sends it to the clipboard.
-
Win + G: Opens the Xbox Game Bar. Choose Catch button and then Camera icon, and the tool will save the image to C:Users>(username)>Video>Captures by default.
-
Win + Alt + Print Screen: Captures only active window. This command saves images to C:Users>(username)>Video>Captures by default.
In some cases, the screen flashes or dims to indicate that Windows has taken a screenshot. If this doesn’t happen, open File Explorer and go to the respective default location to see if Windows saved your image.
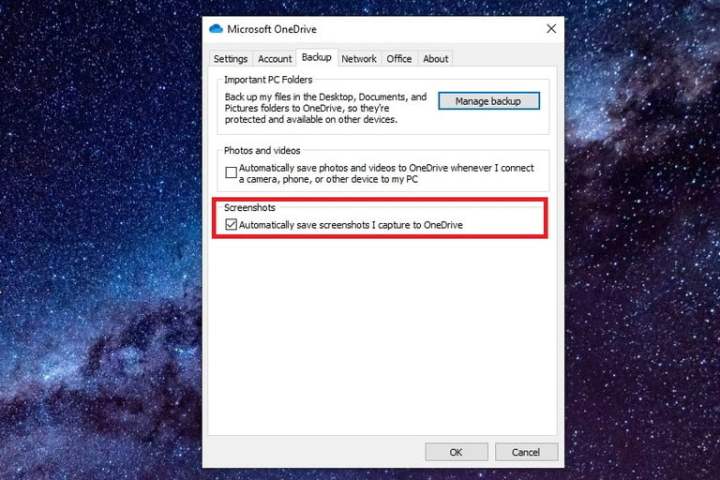
Image used with permission of the copyright holder
How to take a screenshot on a Windows PC: Using OneDrive (Windows 10 and 11)
If you use OneDrive, you can save screenshots to the cloud so they can be accessed from any device. However, it does not save screenshots by default. Instead, you have to choose Cloud icon next to System clock (or in Hidden icon menu marked with an upward-facing arrow).
If this icon doesn’t appear, you may need to open the OneDrive app first and sign in to your account. After selecting Cloud iconchoose Help & settings gear icon and select Arrangement on the pop-up menu. Next, select backup tab in the resulting pop-up window and check the box below Screenshot. Then select OKAY.
(In Windows 11, after selecting Arrangementchoose Sync and backup tab on the left side. In Sync and backup screen, turn it on Save the screenshot I took to OneDrive choice.)
In this case, you can press the first two Print Screen command to automatically save image files to OneDrive. You won’t see the screen flash or dim for this command — you’ll receive a notification. Make sure to sync the Screenshots folder if you want to access the images on your PC.
How to take a screenshot on another device
Need to take a screenshot on a Microsoft Surface product? Check out our handy guide covering a variety of methods.
To take a screenshot on a Chromebook, again, there are a few different methods, but the easiest is a keyboard shortcut. Control + Show Windows button will capture the entire screen, temporarily Control + Shift + Show Windows will let you capture the selected area.
Editor’s Recommendations